


Its always good to keep files secure and do not allow others to crawl your precious documents and use them wrongly. But how could you save your data? The answer to this question is, by doing proper encryption. Encryption is a process where you scramble your data to prevent it from reading unless a correct password or ‘key’ is inserted to open it.
TrueCrypt is a free software which is available for Windows (XP+Vista+7+8), it simple encrypt your files and data very quickly and easily. The way to go about is pretty easy, you just have to encrypt a drive or file container, which has all files you need to protect. In an unlocked container you will be able to access your files like in a normal folder but when the container is closed it becomes inaccessible and it also disappear from search or view.
Here we will see how to do it in detail and secure your data properly.
Create an encrypted file container | Step by step
Step 1 – Install TrueCrypt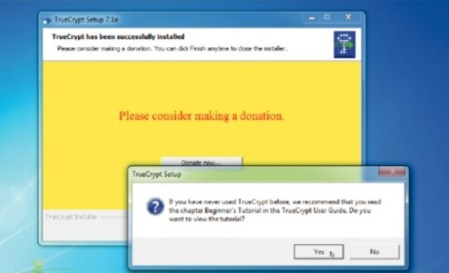
Download TrueCrypt from its website - http://www.truecrypt.org, as its available for Windows, Mac and Linux you can easily select and choose the installation. Its a simple install and in no time with few clicks the icon for TrueCrypt will appear on your desktop screen. Now launch your newly installed program.
Step 2 – Choose Encryption Method
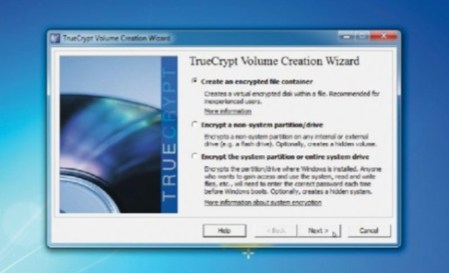
First thing to do is to click on volume button, and select from two choices : if there’s data already on the drive that you don’t want to lose, leave ‘Create an encrypted file container‘ clicked and press ‘Next‘. If you are encrypting the whole disk partition then choose ‘Encrypt a non-system partition/drive’ instead before clicking ‘Next’.
Step 3 – Standard or hidden?
If you get a UAC dialog box, click ‘Yes‘. There are two options for creating a volume – to protect your files from being lost or stolen, leave the volume selected and click ‘Next’ again. You can also select ‘Hidden TrueCrypt volume’, but for this article we will keep it basic, so we choose the standard option.
Step 4 – Set up volume

Click the ‘Select file’ button, browse to your USB flash drive and then type a new name into the ‘File name’ box. Avoid using a file extension, as this can be problematic. Click ‘Save’, followed by ‘Next’ to set up your encryption options for the volume. The annotation above explains how this works. If in doubt, the default options should be fine for most people. Click ‘Next’ to continue.
Step 5 – Set size and password
Set a size for your file container, by choosing a figure with suitable space can make your files encrypt. Click ‘Next’ to enter the password. You’ll need this to access your files in future, so make sure it’s memorable, but also tough to crack. Try to make it at least 20 characters.
Step 6 – Add keyfiles

For additional protection, tick ‘Use keyfiles’ before clicking the ‘Keyfiles’ button. Select at least one file – any will do. In future, your encrypted drive or container can only be opened by selecting that file and entering the correct password. This adds another layer of security to your files, but make sure the file is accessible when you need it. Then click ‘OK’, followed by ‘Next’.
Step 7 – Format volume container
Move your mouse within the TrueCrypt creation window for as long as you can to generate a strong cryptographic key. When you’re ready, click ‘Format’ and the encrypted volume will be created. Wait until the confirmation dialog box appears, then click ‘OK’ followed by ‘Exit’ to return to the main TrueCrypt window, ready to access your encrypted container for the first time.
Step 8 – Mount encrypt container
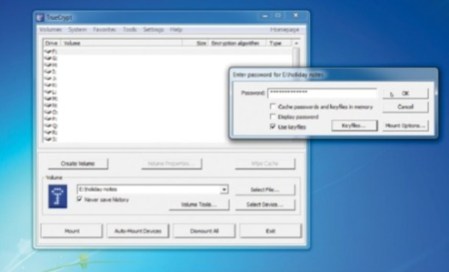
Select a free drive letter from the list. Click the ‘Select file’ button to choose your encrypted container, or click the ‘Select Device’ button to access an encrypted partition or drive. Click the ‘Mount’ button, then enter the password and, if applicable, click the ‘Keyfiles’ button to select the files that will give you access to your container when you click ‘OK’.
Step 9 – Access container
Access container After a short pause you should see your encrypted container appear in the main TrueCrypt window. It can now be accessed like any other drive. Copy or save files directly into here to ensure they’re protected in future. When you’ve finished with the drive, right-click its entry in the TrueCrypt window and choose ‘Dismount’ to lock it away from prying eyes.
Step 10 – Your sensitive data, secured

Now your files are safely stashed away behind TrueCrypt’s ultra-tight encryption, you can relax when moving them from one place to another. Without the correct password and keyfiles, no one else can gain access to your data, so even if you misplace your USB flash drive or find it’s fallen into the wrong hands, your documents will remain strictly for your eye.
|
Stay Connected With Free Updates! Subscribe via Email
|
Follow us! 


|


0 comments:
Posts a comment