iOS - My Tricks Website

Search This Blog

Powered by Blogger.

Popular Posts

Follow us!


You can also receive Free Email Updates:

Widget by ST


Showing posts with label iOS. Show all posts

Monday, 19 January 2015


Android users has crossed iPhone users a way back, plus the app store also has increased significantly. With increase in smartphones everyday, mobile devices has become an essential part of our lives.

Today we are featuring some of best and top Android tips tricks hacks and secrets that we found useful. This is another must visit article for android lovers and users, I am sure you must have known some of these till now, but not all. With new advancement and newer versions of Android we will be updating this list, so bookmark it for future reference.

1. SET UP A PASSCODE

A passcode is critical to have. Think about it: Your phone stores a treasure trove of personal information that thieves would LOVE to steal from you. You don’t want to make things easy for them.
That’s why you don’t want just any passcode, you want a strong one. Users who create 4-digit passcodes such as 0000 and 1234 might as well turn the security feature off.
To set up a passcode go to Settings>>Lock Screen and tap “Screen lock.” In other versions of Android, it’s under Security>>Location and Security>>Screen Lock.
Here you can choose to set a pin number, password or even a connect-the-dots pattern. On newer versions of Android, you also have the option for “Face” or “Face and voice” unlock.
I’d give those a pass. They’re are cool, but not really all that secure.
You’ll want to make sure in your settings that your phone is set to lock automatically after just a few minutes. Letting it sit for hours before it locks kind of defeats the purpose.

2. Disable App Notifications

Bugged by annoying app notifications that just keep coming? If you don’t know already, these app notifications also drain your phone’s battery. If you want to turn them off, and you are on Jelly Bean 4.1 and above, here’s how:
  1. On any of your unwanted notifications in your notification bar, long press on the notification for a message box to appear.
  2. Tap on App Info > Untick Show Notifications > OK.

3. Smart lock

You can unlock your device with a bluetooth or NFC enabled device like your car stereo, your smartwatch or even an NFC sticker. If your handset or tablet is near your bluetooth enabled device, it will recognise that it’s a trusted source and unlock automatically. To turn this on, go to Settings > Security > Smart Lock and add your bluetooth device.

4. Use power saving mode

Most Android device manufacturers have added some form of power-saving mode. You can automatically hobble your phone’s features or shut down specific apps when your battery dwindles below a predetermined level.
Stock Android only offers battery stats for now, but Android Lollipop has a battery saver option built in (which means most phones running Android 5 will too in the future). If you can’t find a power saving option, check out an app like Juice Defender.

5. Maintain it like a PC to improve performance.

While Android can do much more than iOS, it requires more horsepower and user finagling to run smoothly. You can’t do much about upgrading your smartphone or tablet’s processor (barring a new purchase), but youcan take the time to optimize what you have. Much like a PC, Android devices need to be tuned up now and again. There are several apps that can assist you in this, like All-In-One Toolbox. Even without that app though, you can do stuff like deleting old, unused apps, removing widgets you don’t use, and ending unnecessary processes on your own. To do that last one (the concept of which is much like ending processes through control + alt + delete on a PC), go to settings, apps, running, and manually end anything taking up too much RAM memory.

6. Make sure you set up Google Now.

Think of Google Now as your personal assistant. Open the Google app, tap Get Google Now, and then fill in your preferences. You can tell Google Now your favorite stocks, sports teams, and more to get personalized notifications. You can also tell Google Now your preferred mode of transportation for Google Maps.

7. Use Adobe Flash “on demand”

You’ve probably heard that Adobe Flash is available for Android devices. Maybe that’s even a big part of the reason you’ve chosen an Android phone — you want the full web experience on your smartphone. While Flash on a mobile device isn’t the big resource-eating monster some make it out to be, it does make web browsing a little bit slower. And let’s face it — a lot of Flash content is punching monkeys to win a prize-style ads, and often we aren’t interested in seeing those.
That’s an easy fix. Open your web browser, and tap the menu key. Look through the menu until you find the settings. In the browser settings you’ll find an entry titled “Enable plug-ins.” Tap it, and choose On demand. This way once a web page is loaded, you’ll be able to tap any Flash content to view it, and ignore any you don’t want to view.

8. Disable Mobile Data

Whenever you don’t need to stay connected, disabling the Mobile Data can help keep your smartphone battery from draining too quickly. Turning off mobile data is as easy as:
  1. Going to Settings > Data Usage.
  2. Disable Mobile data by toggling the setting from ON to OFF.

9. INSTALL ANTIVIRUS APPS

With just a few clicks here and there, hackers can easily get into your computer and steal your personal information. The same is true of your smartphone. One of the first things you want to do with your new Android is to make sure it is secure.

10. Screen pinning

It’s possible to pin an app to the homescreen which can’t be minimised or removed from the screen. This is particularly handy if you’re prone to accidentally pressing the home or back key. To turn it on, go to Settings > Security and toggle “screen pinning” on. Press the overview softkey (the square icon next to the right of the home key at the bottom of the screen) and select the pin icon on the bottom right of the open applications. To turn it off, hold down the back and overview soft keys.

11. Automate your phone

You don’t need your phone syncing away through the night, so why not introduce a bedtime routine that automatically silences it and kills your data and Wi-Fi connections? With apps like AutomateIt and Tasker you can also automatically turn things on and off based on triggers and rules you define.

12. Take advantage Android’s customization potential.

I can’t tell you how many times I’ve used someone’s Android phone, only to see that they’ve configured it so that their homescreen is full of app icons, much like an iPhone. That’s great and all, but if you want streamlined and simple, Apple’s products do it better. You might as well go crazy if you have an Android device! This means using your homescreen for cool widgets, search bars, etc. To find all the widgets you have, go to your apps page, then select widgets at the top. You might be surprised by how many interesting options are available to you…

13. If you still run out of juice, get an extra battery.

All phones die eventually, and you may not always be near an outlet to charge it. Since many Android phones come with removeable backs, you can replace the battery with a fresh one when you’re on the go.

14. Set your Wifi sleep policy to never

This one sounds counter-productive, but trust us here. If you have access to Wifi throughout the day, and use it often, this will help save your battery. Use this tip with a Wifi toggle widget (see the homescreen section below) and it’s easy.
On your phone, tap the menu button and choose settings. From the list, choose Wireless & networks, then “Wi-Fi settings”. this is where you can choose what Wifi access point to connect to, but there’s also some options hidden. To see them just tap the menu button again and choose advanced. What we’re interested in is “Wi-Fi sleep policy”. Tap it, and set it to “Never”. What this does is keep your phone from switching to the 3G or 4G radio when the screen shuts off. Those radios need more power than the Wifi radio does, so any time we can keep Wifi alive we’re saving energy. Remember to put a shortcut or widget on your homescreen to quickly turn Wifi on and off for those times when you’re not around an access point. This will keep your phone from scanning for available networks.

15. Set Mobile Data Limit

Want to keep track of how far your usage is from your monthly mobile data limit? If you have ICS and above, there is a feature which lets you keep track of how much of the quota you have left.
  1. Head over to Settings > Data Usage.
  2. Set your data limit by dragging the orange line to reflect your monthly quota.
  3. Set your data usage cycle based on when your “month” starts and ends, and you’re done.
You will be alerted once you hit the limit you have set. Note that the tracked data usage of your phone may vary slightly than your carrier’s tracking.

16. SAVE BATTERY LIFE

Android gadgets aren’t exactly known for their stellar battery life, but there are things you can do to make it last.
First, your screen hogs a lot of juice, but it doesn’t have to.
By default your screen is set to automatically change the brightness depending how long it’s been active and the surrounding lighting level. On some gadgets this works well and on some it doesn’t.
You can manually set the brightness by going to Settings>>Display>>Brightness. Adjust the slider so your screen is visible, but not overly bright.
In the same area, Settings>>Display, you’ll see the “Screen timeout” option. This shuts off your screen after you don’t use your gadget for a certain amount of time. Set it to a minute or two and watch your battery life improve.
You can look at other settings in the Display area as well. For example, “Smart screen” keeps the screen on as long as you’re looking at it. This is cool, but it does use a bit more battery life to detect your face.
Other things aside from the display can drain your battery – such as apps. Android’s built-in battery monitor, which you can find at Settings>>Battery, is OK, but it could be better.
The Battery Saver app has dozens of power-saving tips and tricks, like shutting off power-hogging programs. It will also display the amount of time that your battery has left and tell you which apps take up the most power. This way, you can delete the power-hungry apps you don’t need or use.

17. Ambient display

Google has ported Motorola’s popular ambient display feature from the Moto range to Android Lollipop, although it won’t work on every device running 5.0. Ambient display means that when you pick up your device it will partially wake and show your notifications. To turn this on, head to Settings > Display  and toggle “Ambient display” on.

18. Uninstall or disable apps

Delve into Settings > Apps and flick over to the ‘All’ tab to find a complete list of your apps. Anything there that you don’t use is a candidate for the uninstall pile. In their infinite wisdom, carriers and manufacturers sometimes block you from uninstalling their apps, but you usually have the option to disable them instead and it’s worth doing.

19. Ensure your device gets back to you if you lose it.

There’s no surefire way to guarantee you’ll ever see your phone or tablet again if you leave it out in public by accident. That being said, you can improve the chances of it being returned to you by editing your security settings. Go to settings, then security, then owner info. There you’ll see a little box where you can type in contact information that will show up on your lockscreen. This will make it easier for a good Samaritan to return a lost device to its rightful owner.

20. Make sure you’re signed in to your Google account in Chrome.

If you sign in to your Google account in the Chrome browser on your phone, your bookmarks and preferences will automatically carry over.

21. Set up your Homescreens

You’ve got several of them, and with Android you can really put them to good use.  Besides choosing a picture or a live wallpaper app for your background, there’s all sorts of ways to put information and tools right at your fingertips with widgets, shortcuts, and folders.
Widgets are a favorite of many, including yours truly.  You can find one for just about anything, ranging from instant weather information to rolling dice.  While many are important tools, a lot of them are just plain fun, too.  A good number of them will come on your phone, and the Android Market is full of many, many more.
Some apps will add items to the Shortcuts menu, and give you a one-click way to perform the associated tasks.  Same goes for folders; included with your phone are a few live folders for contacts and files, but apps like Facebook can give you new ones.  Of course, you can also create a regular folder to store app shortcuts in.
To have a look at what’s included with your phone as well as anything you’ve downloaded, just long press on a blank area of your home screen.  Choose the option from the list, and drop it somewhere it fits.  If you change your mind, Just press and hold on the widget, shortcut, or folder and in a second or two you’ll be able to drag it down to the trash can.  This doesn’t delete the app from your phone, it just removes the content from your home screen.

22. Add Multiple Google Accounts

You need a Google account to use an Android phone but did you know you can choose to run more than one Google account on your Android device. This is convenient if you use more than one account for several of your Google services. To add multiple Google accounts:
  1. Go to Settings > Add account.
  2. Select Google and setup your New or Existing Google account.
  3. Once added, choose what you want to sync with the account.
Repeat all the steps above if you want to add more accounts.

23. TAKE A SCREENSHOT

It’s one of the simplest things to do on a computer: Just tap the Print Screen button to take a screenshot. It’s just that easy on your smartphone, too! But you’d be surprised how many people don’t know how to do this simple trick. It’s as easy as pressing the power button and volume down button at the same time.
Try it! The screenshot will appear in your photo album.

24. Turn on 5.1 surround sound

Up your cinematic experience by turning on the built-in 5.1 surround sound in Lollipop. To turn the feature on, head to the Google Play Movies app > Settings and select surround sound. There’s even a surround sound demo option if you want to test it out.

25. Hibernate or freeze apps

You may also consider installing Greenify to get a good look at what is running and automatically hibernate apps that you aren’t using, so they aren’t eating system resources unless you start them up.
You’ll need to root your device to really take full advantage, which is simple enough but will take a little time to manage if you’re new to the process. If you do decide to root then you may also consider Titanium Backup Pro for freezing unwanted apps.

26. Make your phone harder to break into than Fort Knox.

Reader warning: don’t do this one unless you’re really afraid of your phone’s information being stolen. To permanently encrypt your Android device, go to settings, security, encryption, and tap “Encrypt phone.” You’ll then be required to create a pin, which you’ll enter every time you turn your phone on (in order to decrypt it). This is like the unlock code on an iPhone, except way more drastic. Usually it will take about an hour for your device to encrypt itself, and it can only be undone through a factory reset. Only do this if you have sensitive information, or want your phone to be as secure as humanly possible. Be aware that encrypting your information will slow down how fast you can access it.

27. Organize apps into folders to keep your home screens neat.

You can create folders to divide your apps into different categories. This reduces clutter, and also makes it easier to find what you need fast. To create a folder, press and hold down on an app and drag it up to the “Create Folder” option on the upper-left-hand side. On some phones you can also drag and drop an app on top of another to create a folder, just like you can in iOS.

28. Move apps to your SD card

Since version Android 2.2 (Froyo), Android has included the ability to move apps from your device’s internal application storage to the microSD card you’ve placed in your phone.  Not all apps can be moved — the developer has to code them properly and things like widgets, live wallpapers and anything else that needs to run as soon as the phone boots up shouldn’t be moved to the SD card at all.  But things like games and other big apps will usually move right over, leaving only a small bit of information behind.
Moving them is easy as pie.  From your homescreen, press the menu button, then choose settings.  From the settings menu, choose applications, then Manage applications.  Find the app you want to move in the list, and tap it’s list entry.  If it can be moved, you’ll see a button that says “Move to USB storage”.  Press it, and go!

29. Disable Automatic App Updates

Prefer to read through app permissions and manually pick which app updates to adopt? You can, but first you need to disable your automatic app updates. Here are the steps:
  1. Open Play Store and head over to Settings.
  2. Tap on Auto-update apps.
  3. Choose Do not auto-update apps.
If you want to enable the auto updates, follow the same path and choose Auto-update appsat any time or via Wi-Fi (available for certain Android devices only).

30. MONITOR YOUR DATA

With most cellular providers, data plans are mandatory with the purchase of any smartphone. Unfortunately, data plans cost quite a bit and don’t get you much data.
That makes it easy to accidentally go over, which means huge overage fees. Android helps you track your data use and set limits before you go over.
Go to Settings>>Data Usage. You can set your billing cycle, data limits and when you get alerts. You can also see how much data you typically use and which apps use the most. That can help you track down data hogs to remove.
If you hit the Settings button in Data Usage you can turn on the “Restrict Background Services” option. This forces the gadget to do updates over Wi-Fi instead of cellular.

31. Screencasting

Screencasting transmits your device’s screen to your TV via your Chromecast. It’s a bit annoying that you need a Chromecast for it to work when other manufacturers offer direct-to-TV transmission, but if you do have the dongle, it’s quite useful. To beam your homescreen over to your TV, simply swipe down the notifications bar and select “Cast screen”.

32. Underclocking the CPU

If you’re willing to root then you can sweep away bloatware and get an optimized custom ROM, you can even download an app like SetCPU for Root Users and tell your processor to run at a slower speed in order to use less power. It’s an extreme step, but it definitely has an impact.

33. Test out different launchers.

If you have an Android phone, you can use these things called “launchers,” which are essentially apps that allow you to make drastic edits to your device’s homescreen. The most popular one is probably Nova Launcher, which will allow you to change just about everything you can think of. There are several other launchers out there too, and you can play around with them until you find one you like. Often, they can make your phone perform faster than they would with the clunky interfaces that companies like Samsung and HTC give them.

34. Use a third-party keyboard app.

Sometimes it’s easier to swipe than it is to type. You aren’t restricted to Google’s keyboard in Android — there are plenty of keyboard apps to choose from in the Google Play store. Swype, for instance, lets you type by swiping to each letter rather than typing.

35. Copying ringtones to the right place, so they appear in the ringtone menu

Customizing your Android phone with your favorite sounds is easy!  Download a few in either .mp3 or .ogg format and save them on your computer.  Connect your phone to your computer and look for a folder named media.  If you don’t have one, that’s not a problem — just create it.  Inside the media folder, you can place your sounds in one of three places; notifications, ringtones, or alarms.  Again, if those aren’t there just create them.  Decide what your sound would be best suited as, and place it in the correct folder.  That’s all there is to it.  Unplug your phone following the direction in the link above, and you’ll find your custom sounds bundled in the menu with the built-in sounds, ready to use.

36. How To Check For Android System Updates

For Android users that are using stock ROM, you may want to look for new updates to your system. To check for updates:
  1. Go to Settings > About phone/tablet.
  2. Tap on System updates.
  3. Tap Check now to look for system updates.

37. Guest mode

It’s now possible to add multiple accounts to Lollipop, including guest accounts for temporary use. This new security feature means that you can avoid someone viewing your personal emails or texts, and you won’t have to worry about your configurations being messed about it with either.
There are three types of accounts that you can set up on Lollipop. First the user account, which has full access to settings and apps. Second there’s the guest account, which happen in sessions and anything done in this time isn’t recorded or saved. Finally, there’s the profile account, which lets the main user restrict how the device is used – disabling certain apps for example. You can quickly add new accounts by touching the profile icon in the top right-hand corner of the lock-screen, or by going into the main settings menu. If you want to add restrictions and manage each account, go to the main settings menu and select ‘Users’.

38. Automatically send certain contacts straight to your voicemail.

There are certain people you just don’t feel like dealing with over the phone. Luckily, you can send them straight to your voicemail with little to no effort. Tap that person’s name in your contact list, tap the three boxes in the upper-right-hand side of the screen, and press “Add to reject list.”

39. Tap to wake

No longer will you have to press the power button to wake your device. Now, all you need to do is simply double tap the home screen and the lock-screen will appear.

40. Access the hidden developer options.

To really get a sense of how customizable Android is, activate the “secret” developer mode. Go to settings, about phone, and click on “build number” seven times. Your device should tell you something like “you’re now a developer!” It’s all very Easter Egg-esque. Once that’s done, return to system settings, and with luck you’ll now see something entitled “developer options.” One of the cool things you can do here is reduce the time it takes for animations to execute, thereby making your phone feel snappier. Do this by going to the “animation scale” options and turning them off (you can make them take longer too, but I don’t see why you would want that). There are plenty of other sweet customizations you can do on this page, but don’t go too crazy unless you know what you’re doing.
So, how did you find these top android tips, tricks, hacks and secrets. Would you like to add anything more, if yes please leave your comments below and we will surely add if found suitable.
Read More >>

Thursday, 6 February 2014


Google Voice – a tremendous service for U.S. people to call and sms their favorite contacts. It’s also giving powerful competition to Skype with the features like forwarding call from your google voice number to real numbers all over the world.

This is pretty awesome service that Google offered but it’s sad that only available in U.S. Hope to see the service in other parts of the world.
However, every good thing has a flip side too. One thing that keep me irritated about using Google Voice is that you have to keep Google Voice webpage open to receive messages. Sometimes, you may close it mistakenly and u become not available to receive any messages.
Opening Google Voice webpage might be inconvenient for many out there like me. So, I started to search Google Voice Desktop notification apps to keep me stay connected with Google Voice account. There are not many softwares out there, but I find some cool softwares after a extensive research that help you to keep notified about any activity with Google Voice account on your desktop.
So, for now, without wasting any time further, have a look on mytrickswebsite compilation of 5 great Google Voice desktop apps to keep you notified about every activity.
1) Google Voice App : To help keep Google Voice open on the desktop, Google voice app is created. As this is app based on Adobe Air, it will work on all popular OS like Windows, Mac and Linux.

2) GVNotifier : GVNotifier is a powerful app that brings Google Voice right to your Windows desktop. Quickly send or receive messages, listen to or read voicemail, connect calls and more. This little app works for Windows XP/Vista/7.

3) VoiceMac : VoiceMac is the first Google Voice client for the Mac. Send multiple SMS Messages, send SMS Messages, receive SMS Messages, place calls, look at your call history, receive voicemail, reverse lookup a phone number, and search your contact list in one easy interface. When you receive a SMS Message or Voicemail, you get notifications view Growl and hear sounds that is customizable.
With SIP support you can place calls from your computer using your favorite SIP service and if you link your Google Voice Number with the SIP service, you can place calls with your Google Voice Number from your computer. With the reverse lookup data, you can see who is calling you, even if their number isn’t in your contacts list.

4) Google Voice (By Google) : It is basically a Google Chrome extension developed by Google team to keep you stay connected with your Google voice account. Adds a button to the toolbar, which displays the number of unread messages in your Google Voice inbox. Main features includes :
  • Audible alert on new messages (can turn off in extension options).
  • Gives you quick access to your most recent messages with transcripts and voicemail playback.
  • Lets you initiate calls and send free text messages by just typing any number or contact name.
  • Makes phone numbers on websites callable via Google Voice by just clicking on them.

5) GVMax : GVMax is a free webservice that monitors your Google Voice account and notifies you when you receive new SMS or Voicemail. GVMax can send you notifications in a number of ways including via Instant Messaging (XMPP/GoogleTalk), emails, Prowl and Howl notifications, Twitter, HttpPost and SMS (more on the way). The following videos show GVMax in action.
Read More >>

Thursday, 30 January 2014


How do you search a popular website, say Twitter or YouTube, on your mobile phone? You would launch the browser, open the corresponding website and then use the search box inside that site. Or you would use the mobile app, if you have installed one.
There’s an alternate way as well. You may consider installing search shortcuts on the home screen of your mobile phone and they will help you perform searches on your favorite website with fewer steps.
Search your favorite websites with fewer steps
Search your favorite websites with a tap
Let’s dive right into an example.
Open the Safari browser on your iPhone (or iPad) and click here to open the search shortcut for Wolfram Alpha. A pop-up dialog will open but since we are installing the shortcut, hit the Cancel button to close that dialog. Now tap the Share icon in Safari and choose “Add to Home Screen” to add that search shortcut to your home screen.
The next time you want to search Wolfram on your phone, tap the Wolfram shortcut available on your home screen, enter the search terms and it will take you directly to the search results on the Wolfram website. That’s just one tap.
You can similarly add search shortcuts on your Android device using the newer version of Chrome browser. Open any of the search shortcuts listed below, “cancel” the pop-up dialog and then choose the “Add to homescreen” option under the main menu to place a shortcut on your homescreen for quick access.

Search Shortcuts for Android and iOS

Here are some ready-to-install search shortcuts for some popular websites that you may add to the homescreen of your Android or iOS device.
  1. Twitter Search
  2. YouTube Search
  3. Google I’m Feeling Lucky
  4. Wolfram Alpha
  5. Google Image Search
  6. Bing Search
  7. Amazon Search
  8. Google+ Search
  9. Wikipedia Search
  10. Facebook Search

Write your own Search Shortcuts

A search shortcut is essentially a little piece of JavaScript, much like a bookmarklet, that accepts input through a pop-up dialog and redirects the user to the search results page.
Read More >>

Tuesday, 24 September 2013


So, after a long wait iOS 7 has arrived. Although the developer version was out to test and I tested it way before the release, but now its available for all.

At first iOS 7 may look totally different to you, the fluorescent area and new icons for your favorite apps can struck you as a newland.
We will be helping you with some basic and advanced features, which are bit confusing at start. Although Tim Cook has given a sneak peak at almost all major features and how to use them at the event. Still we need to polish our senses a bit, about the all new iOS 7.
Some of you may know these tricks and are using iOS 7, but we will try to keep these tricks from beginner level to advance so that you may learn a thing or two. If you know all these tricks before hand then you can know few more of these, share them with us in the comments below.
Also see : iPhone 5s – Review

Search in iOS 7 (Swipe Down)

In iOS 7 to get what you need by typing in on spotlight is shifted to the top of screen, where you need to swipe down and enter text to search.
As far as i know, there was a ‘search on web’ feature, which is no longer available now, but I personally feel that it was useless. I haven’t used it since ages.

Toggles are here (Swipe Up)

TogglesAndroid users are enjoying this feature from a long time, where you just swipe and tap on icons like Bluetooth, WiFI, Airplane Mode etc. This feature has now been integrated beautifully in iOS 7. Just swipe up and new Toggle screen will appear which has all the options to control your Bluetooth, WiFi, Airplane Mode, Do Not Disturb, Orientation Lock and you will also find two sliders containing brightness control and media controls.
Another great addition here is the Flashlight button, so now you don’t need to download an app for flashlight anymore. While playing games this swipe up feature may interrupt, but you can easily switch it off from settings.

Timestamps in SMS

Now you can simple swipe to left, inside your SMS and iMessage chats to get the timestamps. Before there was no such option to view a multithreaded message with timestamps on all the messages, you could only see timestamp at the beginning of chat.
Trust me it does help, when you get into an argument over who sent it, and when. I love this feature.

Level your workspace

LevelI have used the leveling app before and now iOS 7 has integrated it with the famous compass. Just swipe to the left from the compass app and you will see two big bubbles or circles with degrees in between.
The great thing about this app is that, you can reset the screen level to 0˚ at any point. Thought its a bit dull in looks but pretty effective.

Safari Scrolling and Closing Tabs

Now you can view Tabs of Safari in 3D interface with swipe to left feature, which closes the tab instantly.
There is also an “X” button to close the tabs, but I know all the iPhone users will love to swipe and close the tabs.

Block a number on iPhone

You can now block a number in call/sms/facetime within iOS 7 settings. You can find the settings @ Settings > Phone > Blocked; Settings > Messages > Blocked; or Settings > FaceTime > Blocked
Until now there were apps doing this blocking but now iOS 7 gives this important feature in this update. These types of update really give you hope about future updates on iOS.

Cell Usage/Blockage with App by App Feature

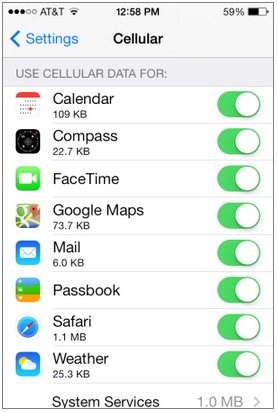
Blockage App by AppNow you can easily check usage of any app in cell usage, means when not in WiFi you can control which app can access your cell data 2G/3G/4G.
Just go to Settings > Cellular and scroll down, you will get a list of apps using the most cell data and simply can turn off the app to use cell data.

Closing Apps ( Swipe up )

Closing AppsNow closing an app in iOS 7 is not really necessary as apps in background in this update uses very less resources, just still if you would like to close an app in iOS 7 you need to double tap on the home button and there will be an list of fullscreen app available, then you can simple swipe an app upwards and it will be closed immediately.
Read More >>

Sunday, 22 September 2013


review iphone 5sReview : iPhone 5s

As expected iPhone 5s has made quite a buzz since its launch, this eagerly awaited phone has got some amazing add-ons and the main area where the key improvements have been made is its inside, as there is no change in the size and weight.

The first ever smartphone providing full 64-bit chip and revolutionary capacitive fingerprint sensor, has really made its Forward-Thinking concept a reality. As expected the “s” versions don’t get too many hardware changes like in size of screen, shape of device and weight of phone.
With newly launched OS, iPhone 5s gets the new iOS 7 which is another major update. So, how does this affect the already strong competitors and the new “forward-thinking” concept of Apple iPhone 5s?

iPhone 5s Review


Hardware

Although it doesn’t have any major difference with its predecessor iPhone 5, you will still get the same aluminium chassis, curved edges, but i really liked the more metallic colors than before.
If you get into the dimensions and weight info then you can expect exactly same values. 123.8 x 58.6 x 7.6mm (4.87 x 2.31 x 0.3 inches) & 112g (3.95 ounces). 4-inch, Retina display with 326px per inch, 500 nits of brightness rating and 800:1 contrast ratio. I hope this all will change in future upgrade.
The major change in design is the new Touch ID fingerprint sensor or scanner, which gets place of the only home button, but there is another major change with dual-LED flash on the back of phone. Plus the A7 chip with 64-bit support has already given iPhone 5s great CPU and GPU performance. All this is due to another coprocessor called M7, which takes the toll off from main processor in measuring motion data. Another upgrade goes into the iSight rear and front camera.
The most important improvement has been the LTE’s support with A1453 with 13 LTE bands, supporting almost all pentaband DC-HSPA+, quad-band GSM / EDGE and quad band CDMA/EVDO rev. Right now Apple plans to sell only the locked versions with Sprint in A1453 band. With A1553 GSM version will get into AT&T, T-Mobile and Verizon. Other places like Europe will have A1457 and Asia will get the A1530 network in LTE. For iPhone 5c will be in similar LTE networks as mentioned above.
Some more features include Bluetooth 4.0, aGPS & GLONASS for navigation, 802.11a/b/g/n as dual-band and the age old 16GB, 32GB, 64GB in storage as seen in earlier versions. One more color is introduced making the lot of 3 colors – silver, space gray (black highlights on top & bottom), and gold. The gold color model has certainly made immense excitement towards Apple enthusiasts.

Touch ID

touch id in iphone 5s
Smartphones with fingerprint sensor idea is not new, and there is one phone from Motorola named Atrix 4G which has this feature but certainly its of no great use, the sensor was not upto the mark, so can we expect iPhone to give better results?
Probably yes, iPhone 5s has been integrated with a state of the art capacitive fingerprint sensor into the home button only. Keeping the functionality to basic, this sensor has an silver ring which is encircling the sensor. It actually acts as a trigger to initiate the scan. Once its activated the sensor takes high quality photos of your fingers with different angles and the first layer beneath the dead skin is being scanned to perfection, the image that is rendered in is about 500ppi, which is pretty awesome.
To complete this setup, you need to follow some basic steps which are pretty easy to learn. iPhone 5s can remember 5 fingerprints of same person or five fingerprints of different person so that you can give access to family or friends.
The process is bit fussy but its effective and once all is done you will be able to repeat it very easily. The first step you need to do is to keep your fingers on the home button and iPhone will gather required information, after than it will ask you to place your finger in different angles, like rolling the fingers and moving it sideways and up-down motion.
Then you will be displayed with your fingerprints and you can also rename them to memorize which finger did you use. If your fingers are not recognized properly then probably you can use security code to get in. Although people prefer to use no security code when using iPhone, in my case I get frustrated with entering passwords again and again when downloading apps from App store. You can easily make your transactions without entering password with Touch ID you can save time and it will have an immense usage graph in near future.
It’s really a fun activity to use Touch ID and in near future you will not even remember what password are you using. Forgot those slide to unlock feature, just press the Home button and you are in, there is a question what will happen to unlock features when your fingers are wet or at humid conditions? Well, if your fingers are wet you will not be able to get in for sure, but in humid conditions it doesn’t give any problem. Actually it will exciting to see people using their toe instead to fingers. I am sure there is a funny video around the corner with iPhone 5s and opening with different body parts.

Camera

camera
Apple has been making its camera to keep it simple and sweat all the time, with competitors going on and on with multiple options like – UltraPixels, ClearPixels, PureView and so on. But for people using Apple iPhones are pretty much satisfied with its working. The main variation in 5s came in larger pixel size and larger aperture, making the camera more sensitive in light.
iPhone 5s camera is not much different then the iPhone 5 in specs, but taking pictures and viewing the visible difference between shots will give you an idea about how does it make more clarity and sharpness in both daylight and night shots. Definitely the night shots are great then iPhone 5 picture taken with same place and time.
With features like auto image stabilization and sharpen shots by taking 4 pictures at a time, iPhone 5s has made an clear leap towards better imaging. The new ISP inside the Apple’s A7 chip has made camera features more responsive than ever. You can now take upto 10 images per second which is then being organized automatically in photostream with a folder in it. Which will give you images which are automatically adjusted with light, exposure, sharpness and face detection. The panning feature gives you adjusted exposure automatically now.
With the new built in dual-LED flash known as the True Tone, the flash is now white and amber making it give you more ambient colors and temperatures.
With Front camera now has an HD resolution it will give you pleasure doing the Facetime chats. 1.2 megapixel, 720p video capability and the new BSI sensor with large 1.9µm px all together makes the front cam more better than ever before.

Read More >>

Thursday, 19 September 2013


Have you ever wanted to watch movies or TV shows online on your iPhone ? Well, there are very few iPhone apps and websites which are offering movies and TV shows online for free, and I think this is because of lack of flash support in iPhone.

But if you are using a WiFi connection on your iPhone, there are few websites and apps which will allow you to watch free movies, TV shows and lots of other cool stuff related to videos. And the best part of these choices that they are totally offering a legal way to watch them online.
So, in this article, I am compiling a list of 6 best apps and websites for iPhone that allows you to watch movies, TV shows or videos online for free.
1) B-Movies :B-Movies is an free app to browse the Internet Archive’s Moving Images library of free movies, films, and videos. New version allows you to browse the movie archive through Edge/3G but you till need Wi-Fi connection to watch movies.
The list of categories includes Animation, Technology, Movies, Religion, Sports and Vlogs. You can alse see the synopsis and ratings given by the viewers for every video in the list. You can alos bookmark your favorite videos, search the categories and also choose videos from Low, Medium and High Quality basis.
B-Movies
2) Hollywood Pocket : This is another cool website which allows you to watch movies online although the collection is not big but surely ahead in terms of video quality. You have to visit the site from the iPhone Safari browser and choose the list of categories which contains News, Action, Comedy, Sci-Fi/Horror, Drama and Documentaries.
You can pause, fast forward or rewind the movie as these movies are in Quicktime format. It has some good old movies collections in its categories. You will get the time details of Run Time of a video in front of the movie cover.
Hollywood Pocket
3) Justin.tv : This is surely a gift for those who wanted to connect with latest news all around the globe. Justin.tv is the simplest live video service in the world using 3G or Wi-fi and watch every live and participate in the chat. You can also create live video and show anyone in the world. When you favorite video goes live, you will get push notifications on your iPhone.
Justin tv
4) Joost : Another free iPhone application with a huge amount of videos available from categories like celebrity news and gossip, music videos, action sports, comedy and web originals. You have option to browse videos by category, popular video or the Joost pics.
for films, documentaries and TV shows, with a huge variety from black and white Betty Boop cartoons to celebrity gossip, from Bridezilla episodes to extreme sports documentaries.You can browse videos by category, browse all the popular videos, or the Joost picks. The main categories of Joost are Film, Music and shows, which are further divided into movie genres like action , comedy, horror etc. But the sad part is film category is limited to clips, trailers and documentaries whereas video available under shows are countless.
Joost
5) Spreety TV iPhone : There is a custom iPhone version of Spreety TV main site which allows you to access a limited categories to watch full episodes of TV shows online through 3G or Wi-Fi on your iPhone. To access the iPhone version of Spreety, you have to open your Safari browser and type iphone.spreety.com. You can see NBC, CBS, CW, clips and limited full episodes through Spreety TV on your iPhone. For the CBS iPhone shows, a Wi-Fi connection is recommended.
There are few glitches as loading of a clips sometimes take time but work fine when you try it again after sometime later. But the full episodes streaming of some shows in high quality format makes Spreety TV mentioning here.

6) Daily Motion : Daily Motion is the free app available in iTunes Apps store. Its basically a video sharing website that allows you to watch millions of videos from all around the world. It has a nifty feature in which you can share the videos which you like the most with your friends via email, Facebook and Twitter.
Daily Motion is a great app to watch short films, music videos, trailers, animation etc. You can also subscribe to 15 channels like News & Politics, Fun, Music, Film and rate videos or add video by signing up a free Daily Motion account.
Daily Motion
If you know of any more apps to watch or stream live TV to an iPhone, post it in the comments! Enjoy!
Read More >>

Wednesday, 11 September 2013


Apple is expected to unveil the iPhone 5S and a cheaper iPhone 5C model at a press event on September 10, 2013. This new smartphone may look like just another iPhone but it’s more than that.

The new iPhone appears to have a combination “Home button/Touch ID sensor”. Leaked images of new iPhone indicate the location of the “Lightning connector”, “Silver ring around home button”, “Volume buttons”, and “Sleep/Wake button.” image
The new smartphone is also expected to have an improved display for “increased brightness and/or reduced power consumption. It’s been reported that smartphone would have a Retina + Sharp IGZO display.
iphone 5s gold
According to the leaked specs, the smartphone will include a faster processor iOS 7, an NFC reader, a Fingerprint Reader, a 4-inch 1136 × 640 display and a new 12 megapixel backside camera with dual LED flash. The new handset will also include 2GB of RAM, a quad-core SGX 554MP4 GPU, an A6 CPU and improved LTE. It also has a bigger battery than its predecessor.
It’s well known that one of the key battlegrounds of smartphone warfare is the specifications of the on-board camera. And as per reports, Apple will launch the 5S with a 13MP camera to give tough competition to other smartphone’s like Sony Xperia Z and Galaxy S4.
Leaked images have been surfacing all over the internet and show that iPhone would be offered in several color choices. There are many speculations about the smartphone hardware as iPhone 5C would be introduced as a less expensive alternative. As per reports, the shell or casing of this smartphone will be plastic, to save money.
Other leaked images have focused on the new (and still rumoured) champagne gold iPhone 5s option. Some of the latest images show the champagne gold option with the rumoured dual-flash.
The new iPhone is expected to land in stores around 20th September.
Read More >>

Saturday, 17 August 2013


Google Adsense app has been launched by Google Inc. in the iOS app store, on Aug 5th 2013. The app falls under the Productivity category of the store.

This app is compatible with iPhone 3GS, iPhone 4, iPhone 4S, iPhone 5, iPod touch (3rd generation), iPod touch (4th generation), iPod touch (5th generation) and iPad. Requires iOS 6.0 or later. This app is optimized for iPhone 5.
Finally we have this official app, from adsense team, a real treat for publishers and bloggers. I love the idea to look into the app every few hours since i have downloaded it. We had to wait for this, but it was definitely worth the wait.
The app basically repots some basic features like key earnings, top custom and URL channels, ad units, site reports and payment alerts.
For me its a boon, as i rely on Adsense revenue, keeping my account handy will certainly make my day easier and more productive, as i can keep track very frequently now.

For Android users

Google AdSense appIf you have a android device, then you already have the app in the Google play store as it was launched just last week.
Both the apps look pretty similar and keeping the app introductions one week away from each other, Google has really made mobile phone more productive and time saving. Android and iOS user will certainly get benefit from this Adsense App.
Android users may not have compatibility with all the devices, like Nexus 7 and HTC devices can’t download this app right now, but surely Google will bring their updated version everyone can have this awesome app.
Tell us, if you are a publisher how important this app will be for increasing your productivity?
Download app from : iOS app store | Google Play Store
Read More >>

Tuesday, 30 July 2013


There are quite a few good apps in the iTunes Apps store that aren’t available to international users. For instance, if you are located outside the US, you cannot install the Apple iBooks app on your iPhone nor can you download Google Earth on your iPad as it only listed in the US iTunes store.
These are free apps on iTunes but you can’t add them to your iPhones or iPods if your iTunes account is linked to a country other than the United States. You may see these apps in your iTunes store but when hit the install button, it will pop-up a warning message saying “Your account is only valid for purchases in the [your country name here] iTunes store.”
Error - iTunes Store in your Country

Download Apps from Another Country’s iTunes Store

There’s however a workaround that will help you install almost any app from the iTunes Apps store even if that app is not available in the iTunes store of your country. The trick works something like this (video screencast available after the jump).
Step 1: Launch the iTunes program and, if you are logged in, sign-out of your Apple iTunes account (Store – > Sign-out).
Step 2: Scroll down and click “Change Country” – select the United States flag.

Change iTunes Store Country
Step 3: Now search for the name of the app that you are looking to install on your iPad, iPhone or iPod Touch. For this example, let’s try installing Adobe Ideas or iBook (both apps are available for iPhone and iPad but limited to US customers).
Step 4: iTunes will now require you to sign-in with your AOL, MobileMe or Apple ID. Instead of logging-in with your your existing Apple ID, click the “Create New Account” button and accept the “Terms and Conditions.”
Step 5: Use an email address that’s different from the one that’s linked to main Apple account. Under Payment Methods, choose “none” for the Credit Card section, give some dummy address and you’ll then receive a verification email.
Step 6: Click the link in that verification email and you’re done. To recap, you have now created a US based iTunes account and this will let you you can download any free app from the iTunes store even if the app is not available in your country.
Read More >>

Saturday, 8 June 2013


Whatsapp is the popular messaging application which allows to send messages worldwide free of cost. It allows also send images and videos worldwide free of cost. In these days everyone have whatsapp messanger to attach with friends. Previously, I posted some tips and tricks about whatsapp, which is hide last seen in whstapp, download whatsapp for pc, make whapsapp lifetime free of cost. In these days iPhone is very popular and mostly persons used iPhone 3g or lower version which is not able to download and run whatsapp in iPhone 3g or lower version because there is lower version of operating system but currently days whapsapp does not support this old version of operation system of your iPhone and it only support the latest version of your iPhone. So don't worry i have trick to run whatsapp in your iPhone 3g, you just follow these simple steps to run whatsapp in your iPhone 3g.

Download Whatsapp for iPhone 3g :

1. First of all, you need to download whatsapp ipa file, for this you just search in google and get whatsapp ipa file, now you would like to transfer this file in your iPhone 3g.

2. For this, you need jailbreak iPhone 3g device to do all following steps.

3. You need to download iFile, for this you simply need cydia to download iFile, now open cydia and search iFile and download it.

4. Now Open iFile and follow below steps carefully,
  • Open iFile > Click Library (top left side in last page)
  • Click System
  • Open Library
  • Scroll down and click CoreServices
  • Now again scroll down and click SystemVersionPills
  • Open Property List Viwer
  • At the bottom click Product Version
  • Now change value to 5.1
  • Now back to top left.
  • Restart your iPhone 3g
  • Now you would able to download and install whatsapp in iTunes or any app store and simply running whatsapp in your iPhone 3g, Enjoy :)

Read More >>
Copyright © 2012 - 2013. MyTricksWebsite - All Rights Reserved
Homepage | About | Contact | Privacy Policy
(Articles cannot be reproduced without permission from the author.)
Author : Navdeep Singh | Powered by: Blogger
DMCA.com